|
Use the [Page Sizes] tab of the "Configure Printer" dialog box to add, remove, or edit an available page size for your printer.
 To access the [Page Sizes] tab: To access the [Page Sizes] tab:
- Highlight your printer, and click the "Configure Printers" icon on the toolbar, or select Setup > Configure Printers. This opens the "Configure Printer" dialog.
- Select the [Page Sizes] tab (Figure 1), and choose your settings.
- Click [OK].
Adding a page size
- From the [Page Sizes] tab, click [Add].
This opens the "Add Page Size" dialog (Figure 2).
- From the [Standard Page Sizes] list, choose a page size that you want to add. If you want to add a custom page size, choose "Custom" from a list.
- Type in a name for the new page size.
- If you choose a "Custom page size", set the Type, Units, Width, and Height. If you choose a Standard size, edit the [Width Margin] and [Height Margin].
- Click [OK].
Editing a page size
- From the [Page Sizes] tab, highlight the page size you want to edit, and click [Edit] button.
This opens the "Add Page Size" dialog (Figure 2).
- If the page size is a Custom page size, edit the Type, Units, Width, and Height. If the page size is a standard size, edit the [Width Margin] and [Height Margin].
- Click [OK].
NOTE: [Fixed Page Sizes] cannot be edited.
Deleting a page size
To remove a page size, highlight it and click [Delete] button.
NOTE: [Fixed Page Sizes] cannot be deleted.
|
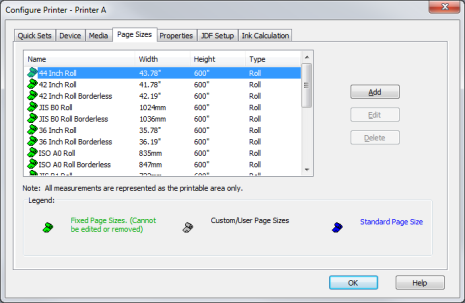
Figure 1
Figure 2
|